|
As some of you may know I am a die hard scratch builder, my claim to fame being my "Lead Sled" chassis from the first
Proxy race held several years ago by Bob Ward on the West coast.... Where I was soundly beaten by Russell Sheldon :-)))
Well, over the last few weeks I have been giving different chassis materials a look see. I have been working on
my Euro-cars to get them to run better on my routed track and after having success with a Ninco BMW V12 project car. I decided
to check some of the other building materials out... I was looking for a nice light material that would work well on
both wood and my Ninco track. A little lead on the chassis for the wood track and a magnet to help with the handling on the
Ninco track... Sounds good to me, now lets see if it will
work :-))
I made up several styrene chassis and they were okay, but lacked the stiffness I was looking for. I had to put styrene
runners down the length of the chassis to keep them from flexing, causing a serious wheel hop problem..
So I tried some Printed Circuit Board ( PC Board ) ... I had seen a chassis that was made from the PC board on one of
the DL's, so I thought I would give it a try.. The first thing that I found was that it was much stiffer than styrene and
didn't need any runners to strengthen the main pan... You should be able to find the PC board at most electronic stores, I
got mine from Radio Shack...
The board is easy to work with and is a snap to cut with a Dremel tool, and can be shaped with no problems with a file
or a sanding block..
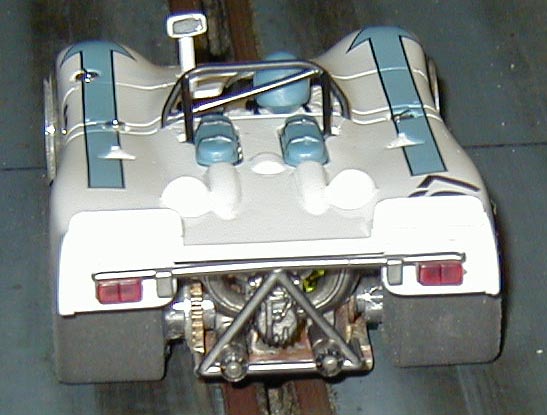
I decided to go with a anglewinder set up on my first try... With this set up I could keep the full interior and rear
end detail of the Porsche 908 I was going to try the chassis under..


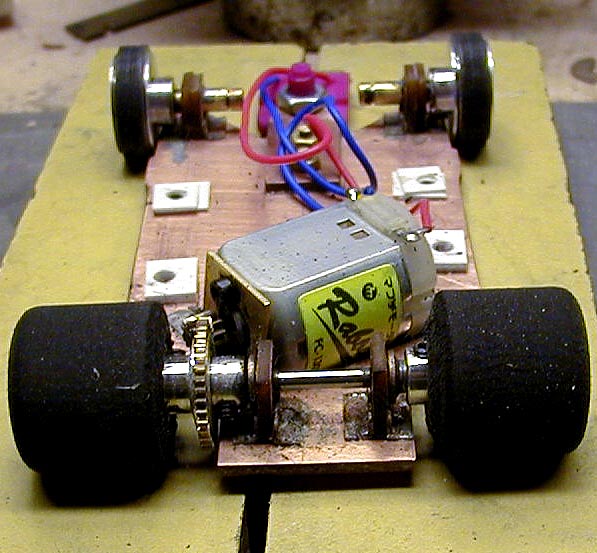
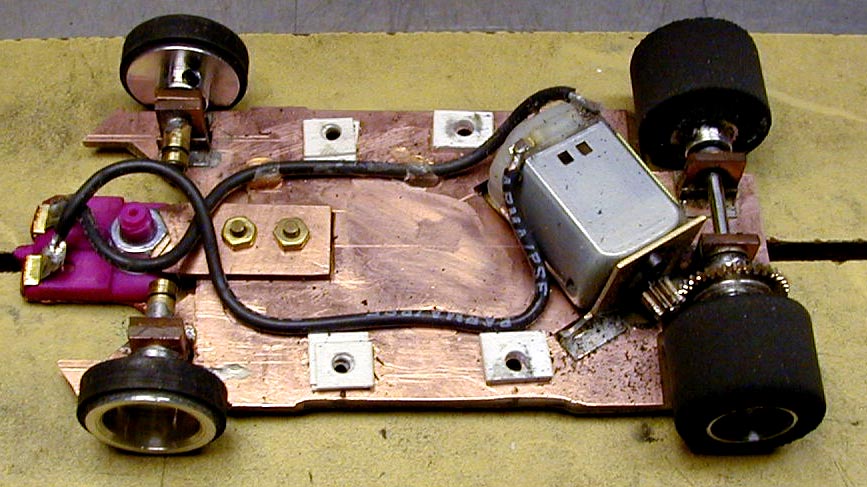
The chassis is a fairly simple pan design.. I used pillow blocks for the front and rear axle carriers, the pillow blocks
are also made from the PC board.. Along with the guide tongue.... The motor bracket is from Champion


There are a couple of things that I learned about working with the PC board material... The first is that you don't want
to over heat the board when you are soldering your parts to it :-))
On my first attempt at doing up the chassis I had cut out the pan and made the slots for the pillow blocks.. On
a regular brass chassis all you have to do is set the pillow blocks and then heat it and let the solder flow into the slot
to the joint... But on the PC board that wont work..
So I found some L channel brass and cut that to size to use as supports of the pillow blocks... Got the pillow blocks
and the L channel parts in place and grabbed my trusty torch which I have used to solder all my chassis with for years. And
thought I will just give it a quick shot of heat to get the parts soldered and... BAD IDEA.... under high heat the copper
film on the PC board will delimitate in short order :-))))
After starting all over I found that a 30 watt soldering iron will get the job done.
But you first need to "tin" all
the parts to be soldered... Then you can put the parts into place and then solder them together with the iron.. For my solder
I used a very fine wire silver solder that I also got at Radio Shack...
I used this method on all my chassis parts except for the guide tongue.. As you see I had to bolt that to the chassis...
I couldn't find any easy was to solder the tongue to the chassis...
The motor bracket was done in much the same way as the pillow blocks but with a slight twist..
For the motor bracket
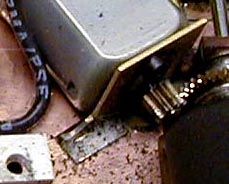
I had to have something on the edge of the PC board to solder the motor bracket too... So I turned the L channel around so
that it now sits on the chassis and also covers the inner edge of the cut out for the motor bracket..

If you look close you can see one of the sections that hold the motor bracket to the chassis... With the channel parts
soldered in place I then soldered in the Champion motor bracket....
With the chassis done I added my running gear... For this chassis I picked a Pla-Fit Rabbit motor, 3/32 axle for the
rear, 1/8" stub axles for my front independent wheel system, Sonic 64 pitch gears, Parma tuna rear tires and American line
1075 front wheels... Then mounted the 908 body using a 4 point mounting system to allow the body to float on the chassis..
.
So how did it the whole thing turn out you ask ??? I am happy to report that the chassis is a great runner......
I had to add a bit of weight to the bottom of the chassis, but the whole car ended up only weighing in at 106 grams (3.8
oz) and that is with the lead weight added to the chassis... As a comparison the Ninco BMW V12 with about the same lead added
to the chassis weighs in at 114 grams (4.0 oz)
The car is a dream to drive.... Just as smooth as any of my brass scratch built chassis cars... And almost as fast...
My brass chassis anglewinder run in the 5.3 to 5.5 second range... Even with the weaker Rabbit motor in the 908 it is running
a consistent 5.6 second range....
So for you guys that are thinking of trying your hand at a plastic chassis... Give some thought to using PC board as
your building material.... Just as cheap to buy, stronger, stiffer and just as light as styrene... Give it a try you'll
like it :-)))
|

