|
2003 American Le Mans Series
Torsion Bar Chassis
For this years ALMS Proxy Race, I have decided to do a torsion bar chassis.. The basis chassis design is a design that
I borrowed from Larry Geddes..
Larry has had great success with his torsion bar chassis in the Marconi Proxy races..
So I thought I would give the chassis design a try.
First of all, what is a torsion bar chassis??? Well, here is my understanding of how the chassis works......
The torsion bar chassis is based on 2 main points....
1) a center pivoit point running down the center of the chassis...
and 2) two torsion bars set on the either side of the center pivoit point.....
The chassis is in fact cut into 2 sections....
The front half holding your front axle carriers and your guide holder.... And the back housing your motor and rear axle unit......
As your car enters a corner the inside wheels want to lift off the track... This lifting takes traction off the inside
rear wheel...... With the torsion bar chassis the front wheels are allowed to lift, but the pivoit point lets both the rear
tires stay flat on the track giving you better traction and acceleration our the the turns.....
I am sure there
is more to it than that, but I don't have the needed knowledge to explain it properly to you....
The one thing I am sure of is that this is one of the best handling chassis that I have come across in a long time.....
I also find that I can build my cars lighter and still get much better handling than my other chassis designs....
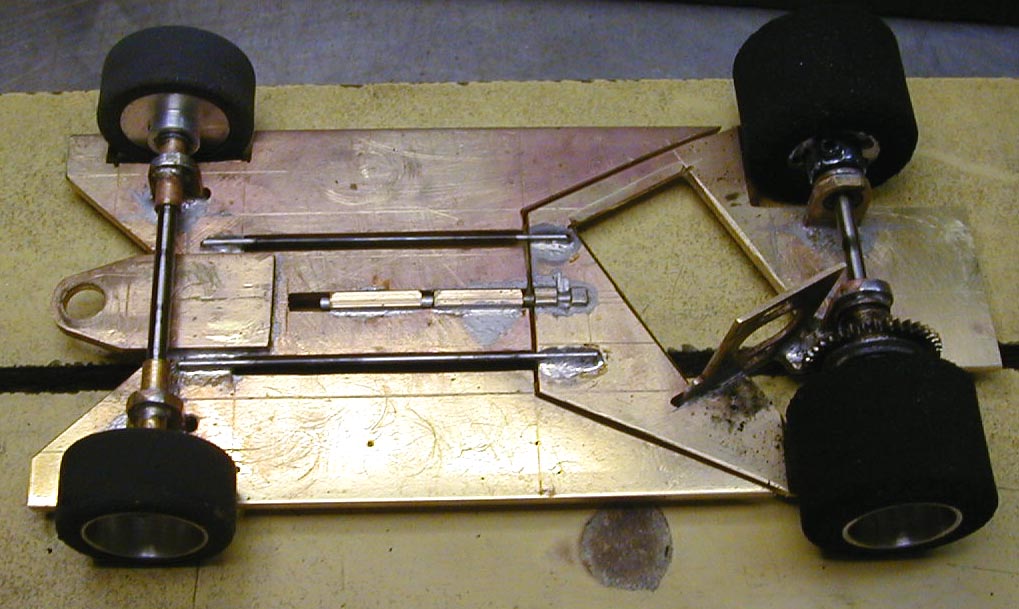
And as you can see in the above picture, the other nice thing about the chassis is it is not all that complicated to
build......
You start out with your basic pan chassis and and then make 3 slots down the pan and then 3 cuts to free the front and
rear sections from each other...... add the center rod and the torsion bars and you are done......... Oh
and before I forget you can make this chassis as a sidewinder, anglewinder or even an inline......
For one of my cars in this years race I wanted to build a Ninco BMW V12... I have the same chassis under my CLK and Panoz.....
( as well as all the other new cars I will be building in the future :-)) )

|
| My Ninco BMW V12 |
Okay, lets get started....... The first thing I did was to get the wheels base set on my chassis jig....... Then all
of my chassis start out as a 2" wide piece of 1/16" thick brass sheet cut to the length I need for the car I am making the
chassis for...
The next step is to do all my layout lines with a scribe.... marking out the cut out for the front of the chassis where
the guide will go...... I also mark out the center line of the chassis front to back.......
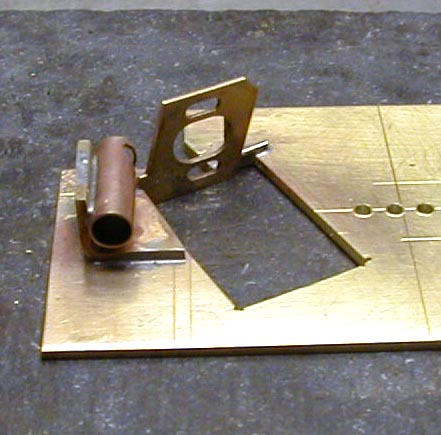
After the layout lines are done I start by making up my rear axle carrier.... Now you can do the carriers 2 different
ways...... the carriers on the top picture are pillow block carriers..... They are nice and neat but take longer to layout
and get right....... For this chassis I wanted to save a little time.. So I used a L-brace to make up the
rear axle carrier.... You can do the same for the front also... They do save time and are much easier for a new builder to
do...
|
| Rear axle unit with the L-brace for the axle carrier |
To set up the rear axle carrier you need to cut a section of brass tubing that will fit the oilets you are going to use.....
Then mount the tube, oilets and gear on the axle and place them in your jig.......
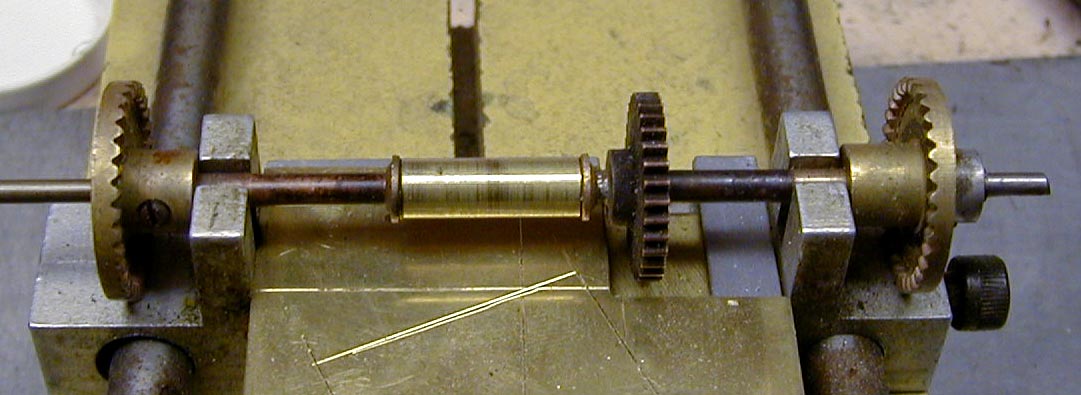
You must use the gear or a gear of the same size on the axle to get the right set back for the motor..... I use brass spacers
on the outside of the gear and the oilet on the other side to keep the carrier and gear centered on the chassis....
Oh and as you can see I have made a notch (cut out) for the gear to clear the chassis....
Once you have that done take a motor.....( I use a old motor with the right pitch pinion attached ) And set the
motor in place so that the gears are meshing.. Then hold the motor in place and scribe around the motor to make the motor
cut out...
The cut out will allow the motor to sit flush with the bottom of the chassis and help lower your CG of the
chassis.......
The cut out is the best way to go.... But you can just solder the motor to the chassis without making the cut out....
|